엑셀[Excel] Win32com 이용하여, 셀 전체 윤곽선 그리기(BorderAround)
엑셀[Excel] Win32com 이용하여, 셀 전체 윤곽선 그리기(BorderAround)

엑셀 작업을 하다보면, 당연히 각 칸에 대한 경계를 그리는 부분에 대해서 중요하게 생각을 합니다. 그래서 이번 포스팅에서는 borderAround함수를 이용하여 셀의 4방향의 윤곽을 나타낼수 있는 윤곽선을 그리는 방법에 대해서 이야기를 해볼까 합니다.
이번 포스팅을 진행하기 앞에서, 관련된 내용은 Pywin32모듈을 바탕으로 진행됩니다. 따라서 관련된 부분에 대해서 다음 링크의 부분을 활용해야 하기 때문에 Pywin32을 설치 해주시길 바랍니다.
파이썬[Python] 014 Pywin32 설치
오늘은 pywin32모듈 설치 하는 방법에 대해서 살펴 보겠습니다. 많은 분들이 python을 사용하는 이유 중 하나는 업무에 있어서 반복적이고 지속적인 업무들에 대해 자동화 하기 위해서 사용 하는 분
appia.tistory.com
먼저 셀의 윤곽선을 그리는 다음과 같은 Method에 대해서 인지하고 있으셔야 합니다.
| BorderAround(ColorIndex, LineStyle, Weight) |
참고로 Weight의 경우 1 , 2, 3, 4 순으로 두꺼워 진다고 보시면 됩니다. 그럼 위의 함수를 바탕으로 간단히 셀들의 윤곽선을 나타내보도록 하겠습니다.
import win32com.client

excel = win32com.client.Dispatch("Excel.Application")

excel.Visible = True

workbook = excel.Workbooks.Add()  # WorkBooks 생성

sheet = workbook.Worksheets("Sheet1")

sheet.Range("B2").BorderAround(ColorIndex = 3,Weight = 3,LineStyle = 1)

sheet.Range("B4").BorderAround(ColorIndex = 3,Weight = 3,LineStyle = 2)

sheet.Range("B6").BorderAround(ColorIndex = 3,Weight = 3,LineStyle = 3)

sheet.Range("B8").BorderAround(ColorIndex = 3,Weight = 3,LineStyle = 4)

sheet.Range("B10").BorderAround(ColorIndex = 3,Weight = 3,LineStyle = 5)

sheet.Range("D2").BorderAround(ColorIndex = 1,Weight = 4,LineStyle = 1)

sheet.Range("D4").BorderAround(ColorIndex = 1,Weight = 4,LineStyle = 2)

sheet.Range("D6").BorderAround(ColorIndex = 1,Weight = 4,LineStyle = 3)

sheet.Range("D8").BorderAround(ColorIndex = 1,Weight = 4,LineStyle = 4)

sheet.Range("D10").BorderAround(ColorIndex = 1,Weight = 4,LineStyle = 5)
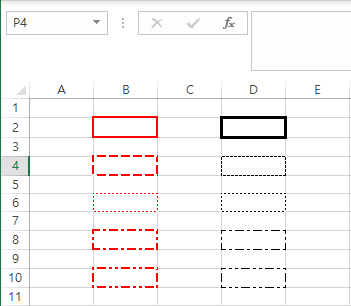
다음과 같은 결과가 나타나는 것을 알 수 있습니다. 단, Weight의 경우보다, Linestyle 부분에 대해서 각 부분을 바탕으로 확인하시길 바랍니다.

위의 부분에서는 함수들을 보면, 하나의 셀을 Range()로 잡아 놓고 진행을 했습니다. 하지만, 이 부분을 다음과 같이 수정해서 코드를 실행하면 어떻게 될까요?
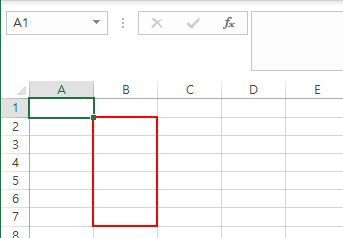
sheet.Range("B2:B7").BorderAround(ColorIndex = 3,Weight = 3,LineStyle = 1)그럼 다음과 같이 여러개을 셀을 하나로 보고, 그 네 면을 경계선으로 표시해 줍니다.

이와 같은 형태로 셀의 윤곽선을 그릴 수 있습니다.
엑셀[Excel] Win32com 이용하여, 특정열의 같은 내용끼리 셀 병합하기 (Merge하기) - 엑셀 자동화
엑셀[Excel] Win32com 이용하여, 특정열의 같은 내용끼리 셀 병합하기 (Merge하기) - 엑셀 자동화
엑셀[Excel] Win32com 이용하여, 특정열의 같은 내용끼리 셀 병합하기 (Merge하기) - 엑셀 자동화 이번 포스팅에서는 셀 병합에 대해서 조금더 고급 방법에 대해서 이야기를 해보고자 합니다.
appia.tistory.com
이번 포스팅에서는 엑셀[Excel] Win32com 이용하여, 셀 전체 윤곽선 그리기(BorderAround)라는 주제로 포스팅을 해봤습니다. 이 부분이 자주 사용되는 부분입니다. 사용하시는데에 도움이 되시길 바랍니다. 감사합니다.